When I first started the Forensics category in CTF, looking at a Wireshark screen filled with thousands of packets felt like trying to find a specific grain of sand on a beach. If you’ve ever felt that “analysis paralysis,” this guide is for you.
In this writeup for the picoCTF “Ph4nt0m 1ntrud3r” challenge, I’ll show you how to move past the “noise” and think like a digital forensic investigator. We aren’t just looking for a flag; we are reconstructing an attacker’s fragmented trail.
1. Challenge Strategy: Why This Article Matters
- Challenge Name: Ph4nt0m 1ntrud3r
- Category: Forensics (Network)
- Difficulty: Easy
- The Problem: An attacker hid a flag by splitting it into small pieces across multiple network packets.
My Experience
Many beginners get stuck manually clicking every packet. I wrote this to demonstrate that forensics is about pattern recognition and automation, not manual labor. I’ll share the exact “aha!” moment when the data started making sense to me.
2. The Investigation Log: My Thought Process & Failures
Before the “perfect” solution, there was a lot of trial and error. Here is the reality of my analysis:
| Step | Action Taken | My Internal Monologue | The Hurdle |
| 1. Recon | Scrolling through Wireshark | “TCP, HTTP… looks normal. Is there any weird protocol?” | Too much noise. 1,000+ packets are impossible to check by eye. |
| 2. Discovery | Sorting by Length | “Wait… why are there multiple packets with an odd size?” | Identifying which packets were “padding” vs. “payload.” |
| 3. Hypothesis | Inspecting payloads | “Those strings end in =. That’s a Base64 signature!“ | Some fragments lacked =, making me doubt the encoding at first. |
| 4. Failure | Manual stitching | “I’ll just copy-paste these… wait, the flag looks like gibberish.” | The packets were out of order. I forgot that network arrival $\neq$ logical order. |
| 5. Success | Python Scripting | “Let’s use timestamps as the source of truth and automate it.” | Formatting the timestamp data correctly for the script. |
3. Step-by-Step Guide: Beyond the Basics
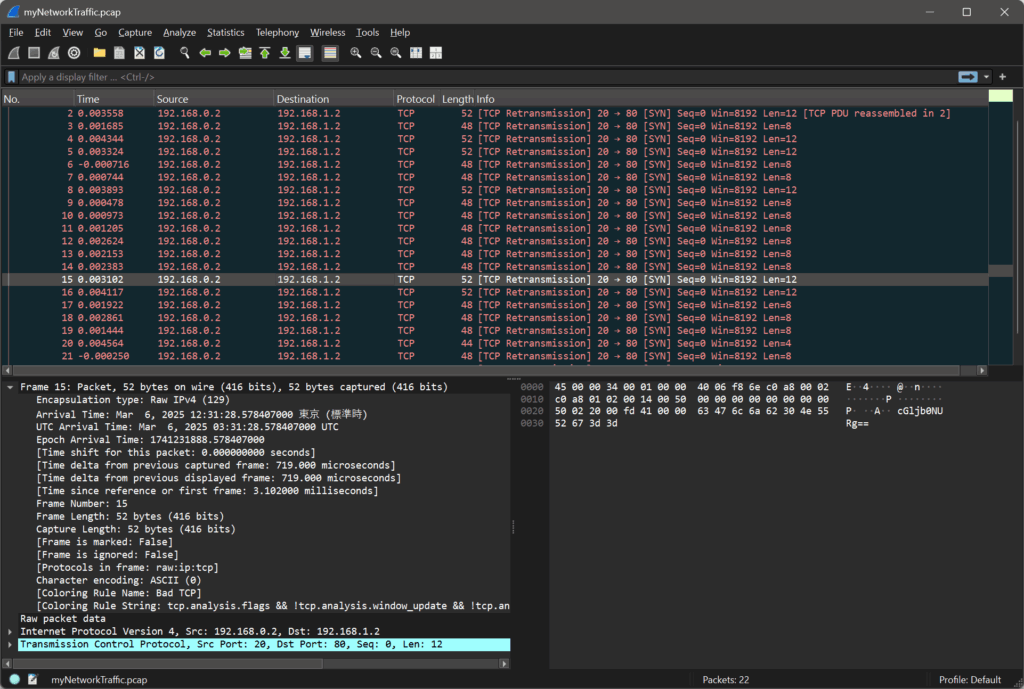
Step 1: Isolating the Anomalies in Wireshark
In real-world forensics, attackers hide data in plain sight. Open evidence.pcap and immediately sort by the Length column.
In this challenge, you’ll notice standard traffic uses specific lengths (e.g., 48 bytes), but our “intruder” packets stand out.
Pro Tip: Why search by length? In data exfiltration, attackers often use fixed-size “chunks” to bypass simple firewalls. These consistent but unusual packet sizes are your “smoking gun.”
Step 2: Recognizing the Base64 “Tell”
Base64 is a common way to encode binary data as text.
If you see random-looking letters ending in = or ==, that’s a strong hint that it’s Base64.
There is a lot of information, so look at length other than 48 bytes.
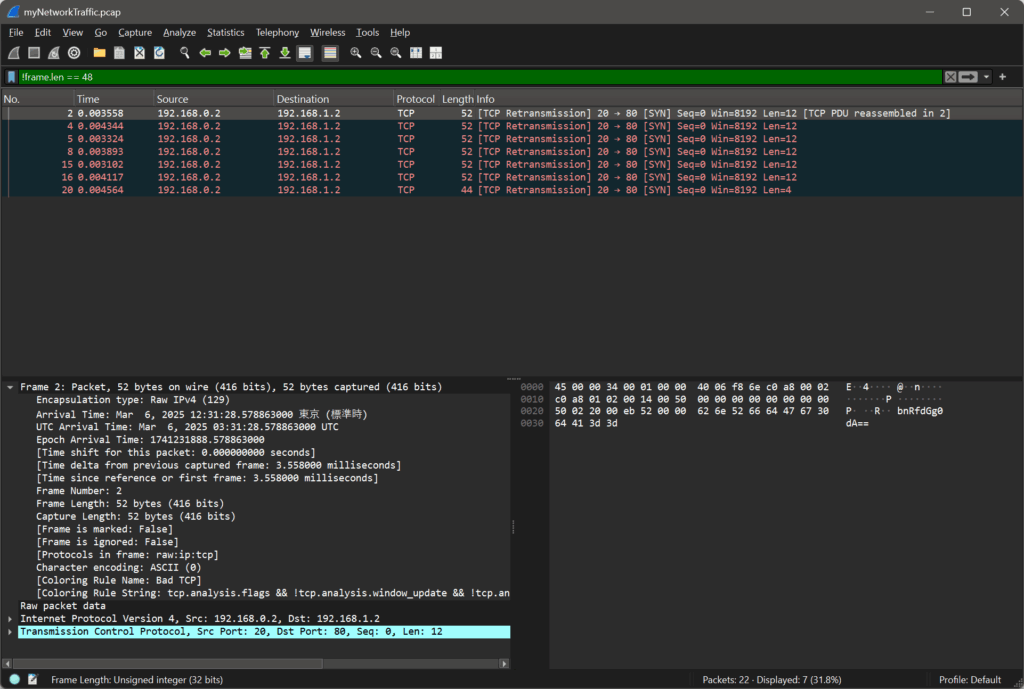
Here’s what some of the captured data looks like:
31.28.5788 bnRfdGg0dA==
31.28.5796 NjZkMGJmYg==
31.28.5786 ezF0X3c0cw==
31.28.5791 XzM0c3lfdA==
31.28.5784 cGljb0NURg==
31.28.5794 YmhfNHJfOQ==
31.28.5798 fQ==
Once you click on the suspicious packets, look at the Data pane. You’ll see strings like cGljb0NURg==.
Real-World Context: Malware often encodes C2 (Command & Control) instructions in Base64 to bypass Deep Packet Inspection (DPI) that looks for “cleartext” malicious commands.tes on 3-byte blocks, it uses the = sign as “padding” if the data doesn’t fit perfectly. Seeing a trailing equals sign is the #1 tell-tale sign of Base64.
The “Tell”: The = character at the end is called “padding.” Base64 groups binary data into 3-byte blocks; if the data doesn’t fit perfectly, = is added.
⏱ Step 3: Sorting the packets by time
The data seems out of order, so let’s sort it chronologically by the timestamp:
31.28.5784 cGljb0NURg==
31.28.5786 ezF0X3c0cw==
31.28.5788 bnRfdGg0dA==
31.28.5791 XzM0c3lfdA==
31.28.5794 YmhfNHJfOQ==
31.28.5796 NjZkMGJmYg==
31.28.5798 fQ==
Once we have them ordered correctly, we can decode each Base64 string.
Step 4: Automating the Reconstruction
Because the packets arrived slightly out of sequence, we need to sort them by their Arrival Time and then decode them. Here is a clean Python script to handle the heavy lifting:
import base64

cipher = [
    "cGljb0NURg==",
    "ezF0X3c0cw==",
    "bnRfdGg0dA==",
    "XzM0c3lfdA==",
    "YmhfNHJfOQ==",
    "NjZkMGJmYg==",
    "fQ=="
]

plain = ""
for c in cipher:
    decoded = base64.b64decode(c).decode()
    plain += decoded

print(plain)
Step 5: Running the Script
Run the script in your terminal:
$ python3 decode.py
Output:
picoCTF{1t_w4snt_th4t_34sy_tbh_4r_966d0bfb}
🎉 We’ve found the flag!
Final Flag
picoCTF{1t_w4snt_th4t_34sy_tbh_4r_966d0bfb}
4. Troubleshooting & Deep Dive (The “Expert” View)
“What if I don’t see any = signs?” Not all Base64 strings have padding. If you suspect Base64 but don’t see the =, check the character set. If it only uses A-Z, a-z, 0-9, +, /, try decoding it anyway!
“Why was my flag corrupted?” Network packets can arrive at different times due to latency. In this challenge, the Timestamp is your anchor. In more complex challenges, you might need to follow the TCP Sequence Numbers to ensure you are reading the data in the order the application intended.
5. Summary & Key Takeaways
- Context over Content: Don’t just look at what the data is; look at how it’s behaving (packet length, frequency, timing).
- Scripting is Mandatory: Manually decoding 7 fragments is easy, but what if there were 700? Always look for the scriptable path.
- The Base64 Habit: Whenever you see alphanumeric “gibberish,” Base64 should be your first guess.
Final Flag: picoCTF{1t_w4snt_th4t_34sy_tbh_4r_966d0bfb}
📚 Further Reading
Here are related articles from alsavaudomila.com that complement this challenge: